Lasso Instance Manager
Lasso Instance Manager is a companion tool integrated into Lasso Server that permits the management of one or more Lasso Server instances, which are isolated lassoserver processes each running within their own environment. This tool can install and uninstall new Lasso Server instances and allows those instances to be configured in one convenient location.
Lasso Instance Manager stands as an intermediary between the individual Lasso Server instances and the web server. Each Lasso Server instance is configured with a host name pattern. By default, Lasso Instance Manager catches all requests with the file extension “.lasso” and all requests where the URI path begins with “/lasso9/”, and it uses the instance’s host name patterns to determine which running instance should serve each request.
Initialization
After the initial installation, you will be presented with a simple install acknowledgment and a process to initialize and create the first instance. Under OS X this will be a web page; under Linux you will see output in the terminal giving the URL http://your-server-domain.name/lasso9/instancemanager.
When Lasso Instance Manager is run for the first time, it will look for an existing Lasso Server installation that was installed through the Lasso Server 9.0 installer and will import that instance. No files will be removed. The Admin LassoApp will be updated and any existing Lasso Server 9.0 Apache 2 configuration file will be disabled.
If no existing Lasso Server 9.0 instance is located, a new Lasso Server instance will be created named “default”. This default instance will be configured with the same administrative username and password that was selected when first initializing Lasso Instance Manager, and is set up to respond to all host names.
User Interface
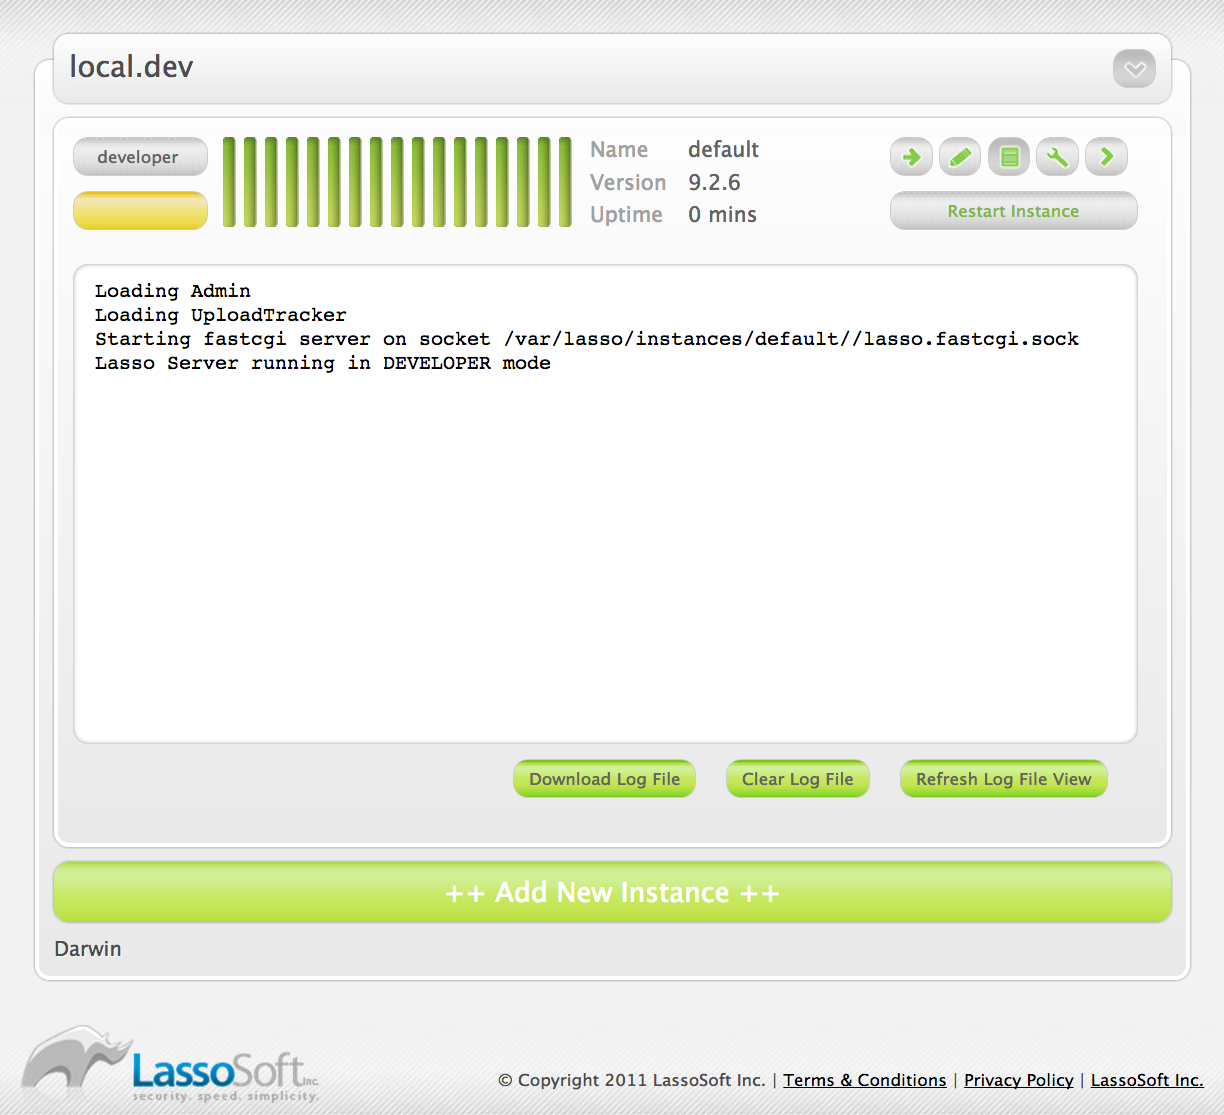
The main interface for Lasso Instance Manager consists of a list of all known Lasso Server instances on that machine. Below this list is a button for creating new instances.

Lasso Instance Manager – Main Screen
Each instance in the list shows:
- Current licensing mode, based on the instance serial number, if any.
- Current run status: red is not running, yellow is running but with a developer license, green is running and fully licensed.
- Instance name
- Instance version (as of 9.2.5)
- Instance uptime
Additionally, a row of buttons on the right permit access to the following:
- Instance configuration: instance name, description, admin URL, home path, OS user, host pattern, Disable Instance button, Delete Instance button
- Instance notes
- Instance output log
- Instance environment variables
- Instance admin link
- Restart Instance button
Note that Lasso Instance Manager periodically updates the interface automatically to show each instance’s status.
Add a New Instance
Click the ++ Add New Instance ++ button at the bottom of the interface. This will present a form for customizing the Lasso instance to be created. When done, click the + Add button at the bottom to create your new instance.
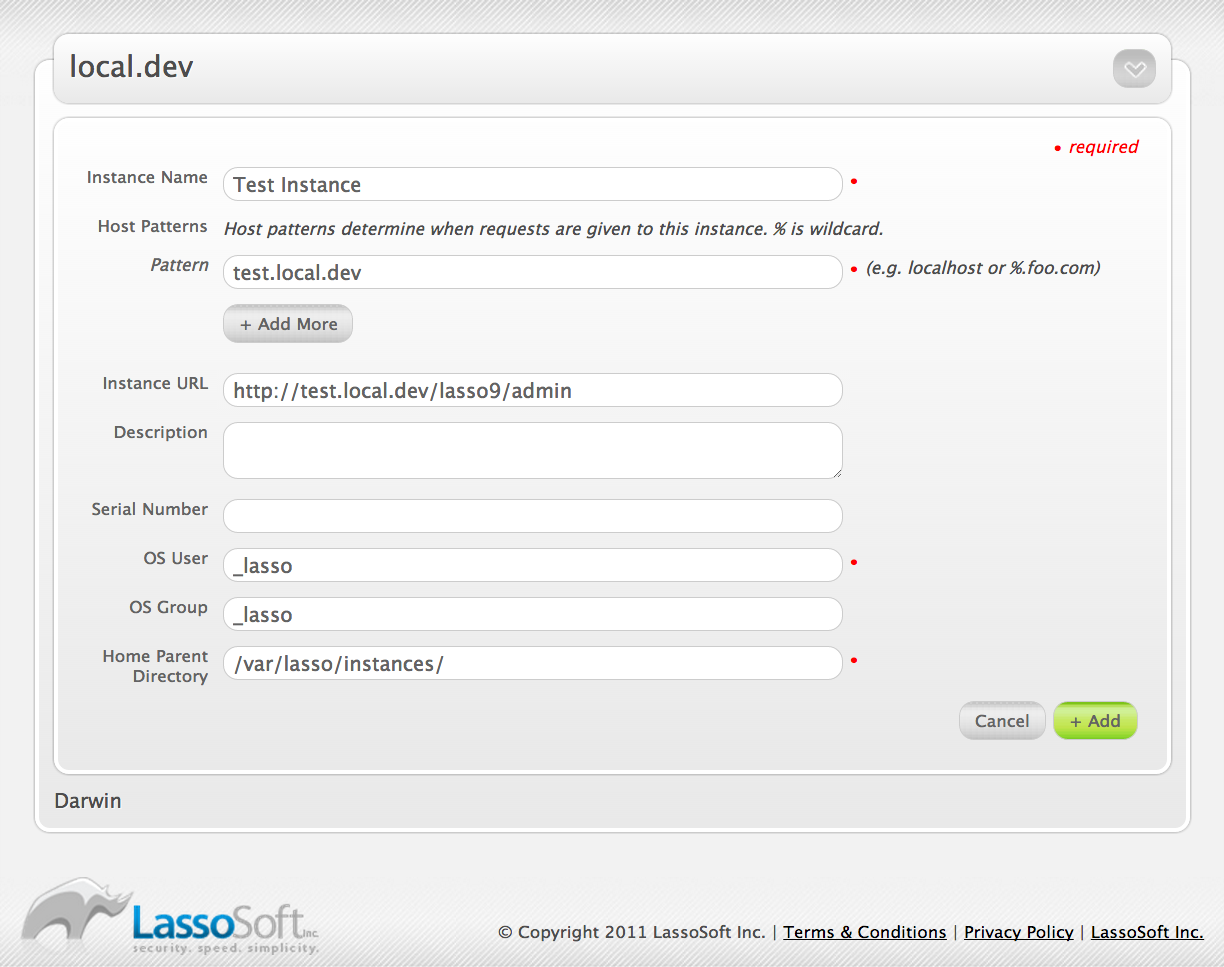
Lasso Instance Manager – Adding an Instance
Instance Creation Fields
- Instance Name
- This is the name of the new instance. It serves to uniquely identify the instance among the others.
- Host Patterns
A host pattern is a string of characters that are matched against the incoming HOST field of the HTTP request. An instance may have several of these patterns. These patterns serve to direct individual requests to specific Lasso instances. A host pattern resembles a domain name, and can contain the wildcard character “%”. The pattern
%foo.comwould match “www.foo.com” and “foo.com”. The patternlocalhostwould match only “localhost”. If no instance is configured to respond to a given host, an error will be returned to the client.Note that the host pattern uses globbing rather than regular expressions for pattern matching.
- Instance URL
- This URL is used only within the Instance Manager. This URL provides a convenient way to link from the Instance Manager to a page served by that Lasso instance.
- Description
- An optional description of this Lasso instance.
- Serial Number
- If you already have a license serial number for the new instance, enter it here.
- OS User
- The new instance will consist of a process that runs as this specific operating system user. Additionally, the Lasso home directory will have its permissions adjusted to restrict access to users other than this one. The default username is “_lasso”.
- OS Group
- This group name will be used for adjusting the Lasso home directory permissions. If left blank, the OS user’s default group will be used. The default group is “_lasso”, which is used with the OS username of “_lasso”.
- Home Parent Directory
Every Lasso Instance has a home directory. This directory is automatically created within the path specified by this form field when the instance is created. This field only specifies the path up to the directory in which the new instance’s home directory will be created. The name of the new instance’s home directory will be the name of the instance (specified in the first form field). Note that illegal characters and spaces will be stripped from the new directory name.
- Unless manually edited, new instance home directories are created in a specific location within the directory housing the Lasso Instance Manager. This location will differ based on the platform on which Instance Manager is running. This location is shown at the time a new instance is being created. If this path is edited, the new value will become the default for subsequently created instances (though the path can still be edited).
- By default, ownership of the new instance’s home directory will be set to what is specified in the “OS User” and “OS Group” fields.
The most important bits of information to fill in are the instance name and the host pattern. The rest can be left as they are unless you have a specific need to tailor this instance.
By default, all new instances run as the “_lasso” operating system user. For enhanced security between different Lasso instances, use a different OS user and group for each. As an OS user is permitted to read files owned by that user, Lasso instances with the same OS user are able to share files among themselves. In many cases this is not a problem, or may not even be desired, but if a single computer is hosting many instances for many different users, differing usernames may be required.
Change Instance Configuration
After an instance has been created, the instance’s host patterns and URL can still be modified. Click the instance’s “Configuration” button (the first of the five in the top right) to reveal the configuration for the instance. A button is shown next to the editable items. Click the button and follow the directions to edit these items.
Disable an Instance
If an instance needs to be temporarily disabled, first click the instance’s “Configuration” button to reveal the configuration for the instance. Then, click the Disable Instance button. This will terminate the instance’s process. The instance will no longer be automatically started and can no longer serve requests. To re-enable the instance, click the Start Instance button near the top right of the instance view.
Delete an Instance
When an instance is no longer required, it can be removed. First, click the instance’s “Configuration” button to reveal the configuration for the instance. This view contains a Delete Instance button and a checkbox for specifying that the instance’s home directory should be deleted as well. If this checkbox is not checked when the Delete Instance button is clicked, the instance’s home directory will be left in place. Deleting an instance will terminate that instance’s process, remove the instance from the list, and optionally delete the instance’s home directory.
Add Instance Notes
Instance notes are for your own reference. They permit reminders or important details to be associated with an instance. To add an instance note, click the instance’s “Notes” button to reveal the instance notes view. Type your note in the provided text area and then click the + Add Note button.
View Instance Logs
Lasso Instance Manager captures the last number of lines of console output generated by a Lasso instance. Click the Logs button to show the log for an instance. While the view is shown, the log data will automatically refresh. The data can be manually refreshed by clicking the Refresh Log File View button. Each log can be cleared or downloaded by clicking the appropriate button in this view.
Lasso Instance Manager – Viewing Instance Logs
Modify Instance Environment Variables
Environment variables control how an instance runs or how the software that an instance is using (e.g. ImageMagick or Java) operates. Click the instance’s “Variables” button to reveal the environment variables view. All current variables are shown in this view. Existing variables can be removed, and new variables can be added. Any variable modifications will not take effect until the instance is restarted.
New instances are automatically configured with the LASSO9_HOME and
LASSO9_MASTER_HOME variables. It is recommended that these not be
modified or removed unless a highly customized instance is required.

Lasso Instance Manager – Adding Instance Environment Variables
Restart an Instance
Clicking the Restart Instance button will open an alert, confirming your intention to restart the instance. Pressing Cancel will clear the alert window and nothing further will happen. Pressing OK will terminate the instance’s process and then restart that process. The instance’s running light will switch to green or yellow once the instance is fully running again.
If the instance isn’t currently running, the button will say Start Instance. Pressing the button will not result in a prompt, and will instead immediately start the instance.
Update License Serial Number
Click the button in the instance’s main view which shows the instance’s licensing status (upper left corner button). A dialog will appear, permitting a new serial number to be entered. Setting an instance’s serial number will restart that instance.
Instance Home Directory Contents
A Lasso instance’s home directory can contain several folders and files that can be used to tailor the instance. Specifically, these are the “LassoApps”, “LassoLibraries”, “LassoModules”, and “LassoStartup” directories. However, by default, an instance will also look for the first three directories in the Instance Manager’s home directory. Files can be placed in the appropriate location inside of the instance’s home directory in order to override the files provided by the Instance Manager.
- LassoApps
- The LassoApps directory contains applications that are loaded when an instance starts up. At startup, the instance finds all the applications in the Instance Manager’s “LassoApps” directory and compares it with the applications in its own “LassoApps” directory. Any applications in the Instance Manager’s “LassoApps” directory with the same name as those in the instance’s home directory are skipped. This allows an instance to install its own version of a Lasso application with the same name without ever loading the Instance Manager’s version.
- LassoLibraries
- The LassoLibraries directory contains all available on-demand libraries. These libraries are loaded as required as the instance runs. Whenever an attempt is made to use a non-existent method or type, the “LassoLibraries” directory is searched for a suitable implementation. An instance will first look in its own home directory for such a library. If not found, the Instance Manager’s home directory is searched. This permits an instance to override a library that would have been loaded from the Instance Manager’s home directory with its own version or to have its own instance-specific library.
- LassoModules
- The LassoModules directory contains all Lasso C API (LCAPI) modules. These are all loaded when an instance is first started. The instance will first load all modules located in the Instance Manager’s home, and then all modules located in the instance’s home. This permits an instance to replace an LCAPI module with its own version, if required, or to have an instance-specific LCAPI module.
- LassoStartup
The LassoStartup directory contains plain-text Lasso files which are read when the instance starts. Any uncompiled custom types or methods can be placed in files ending in either “.lasso” or “.inc” and will be available across the instance.
Note
Lasso only searches for “LassoStartup” in each instance’s home directory, and not in the Instance Manager’s home directory.
Starting and Stopping Lasso Instance Manager
Stopping the Lasso Instance Manager process differs on each platform.
| OS X: | The OS X installer creates a launchd service that manages the Instance Manager process. To stop this service, execute the following command from the terminal: $> sudo launchctl unload /Library/LaunchDaemons/com.lassosoft.lassoinstancemanager.plist
|
|---|---|
| Linux: | The CentOS and Ubuntu installers create a service “lassoimd” for the Instance Manager executable, which loads at startup. To stop this service, execute the following command from the terminal: $> sudo service lassoimd stop
|
| Windows: | The Windows installer creates a service that can be stopped using Windows’ built-in Services application by selecting the “Lasso Instance Manager” service and clicking the square “Stop Service” button. |
Stopping the Instance Manager will also stop all Lasso instances. No Lasso instance will be able to serve any requests while the Instance Manager is not running.
When installed, Lasso Instance Manager is configured to automatically start when the computer boots up. If the Instance Manager has been manually stopped, it can be manually started again.
| OS X: | The OS X installer creates a launchd service that manages the Instance Manager process. To start this service, execute the following command from the terminal: $> sudo launchctl load /Library/LaunchDaemons/com.lassosoft.lassoinstancemanager.plist
You can then verify that Lasso Instance Manager is running: $> ps -ax | grep lassoim
62 ?? 7:10.95 /usr/local/lasso/lassoim
|
|---|---|
| Linux: | The CentOS and Ubuntu installers create a service “lassoimd” for the Instance Manager executable, which loads at startup. To start this service, execute the following command from the terminal: $> sudo service lassoimd start
You can then verify that Lasso Instance Manager is running: $> sudo service lassoimd status
lassoimd (pid 4653) is running...
|
| Windows: | The Windows installer creates a service that can be started using Windows’ built-in Services application by the “Lasso Instance Manager” service and clicking the triangle “Start Service” button. You can then verify that Lasso Instance Manager is running by checking if the “Status” column for the “Lasso Instance Manager” service says “Started”. |
Uninstallation
| OS X: | An uninstaller is provided in the same package as the original installer. Run
this to uninstall Lasso Instance Manager. This action will remove any Lasso
instance home directories that were created in the default location
(/var/lasso). This will not remove any home directories that were
created in custom locations. |
|---|---|
| Linux: | Use the standard package manager (yum or apt) to uninstall Lasso Instance Manager. |
| Windows: | Use the system’s built-in uninstall utility via the Programs and
Features control panel. |